Aligning with PHD2 via Drift Align

Alignment using the program "PHD2" (version 2.6.11)

If no crosshair eyepiece is included in the astrophotography equipment or a rethinking of the celestial direction is to be facilitated or the waiting time during the Scheiner-method is to be shortened, the guiding program "PHD2" from Stark Labs can be used. This program recognizes very quickly in which direction a star is moving, and it is not necessary to perform several iterations after the alignment has been completed, as it is the case with the Scheiner-method. In addition, it is possible to interactively display whether the error correction was made in the right direction and also far enough. The following steps show the procedure for the alignment with the program "PHD2".


StepDescriptionIllustration
(1)
  • The starting position is assumed to be the same as for Scheiner-method: The telescope is set up, aligned as best as possible, tracking started, and a star on the meridian at the southern celestial equator is sought.
  • Make sure that the guiding camera and all accessories are mounted.

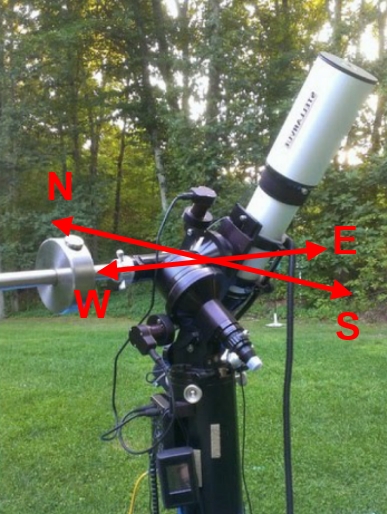
Approximate position of the telescope when searching for a star at the meridian in the South near the celestial equator [1]
(2)
  • Start "PHD2" and check if all required data (e.g. guide focal length, pixel size of the camera etc.) have been entered correctly.
  • Couple the equipment (mount, camera etc.) with the program

Setting of equipment in "PHD2“ [1]
(3)
  • Start "Guiding" and select a guide star
  • Then start a calibration [1] (This can be done by clicking on the green icon while holding the Shift key).

Guiding view in „PHD2“ [1]
(4)
  • Select "Drift Align" in the menu bar under ‘Tools’ [1]

Selecting "Drift Align" in the menu [1]
(5)
  • An editing window will open describing the procedure.
  • Click on 'Drift' in this window [1]
Editing window of "Drift Align" for the azimuth setting [1]
(6)
  • Two trend lines appear (red - declination and blue - right ascension). [1]
  • The red line indicates the deviation to be corrected. [1]
  • After briefly swinging back and forth, the red line stabilizes. [1]
  • Around the guiding star there is now a violet circle whose diameter depends on the deviation. [1]
Graphical illustration of the azimuth error in "PHD2" [1]
(7)
  • Click "Adjust" to stop the "Guiding" and make the adjustment [1]
  • The goal is to get the red trend line to be horizontal using the azimuth adjustment. [1]

Editing window of "Drift Align" for the azimuth setting [1]

(8)
  • Adjust the azimuth screws so that the star is positioned on the violet circle [1]
  • There is a note area in the instruction window that can be used to note what effect turning the respective azimuth screw has. This is helpful the next time the mount is to be aligned. [1]

Moving the guide star to the purple circle [1]

(9)
  • Click on 'Drift' in the window again and wait a short time until the lines have settled in [1]
  • If the wrong azimuth screw was operated, the red line has become steeper and it must be turned in the other direction. [1]
  • This is repeated until the red line is aligned horizontally [1]

Corrected azimuth adjustment [1]

(10)
  • Next, the polar altitude correction has to be done.
  • To do this, select with the telescope a star in the East or West 20 to 30° above the horizon at the celestial equator. [1]

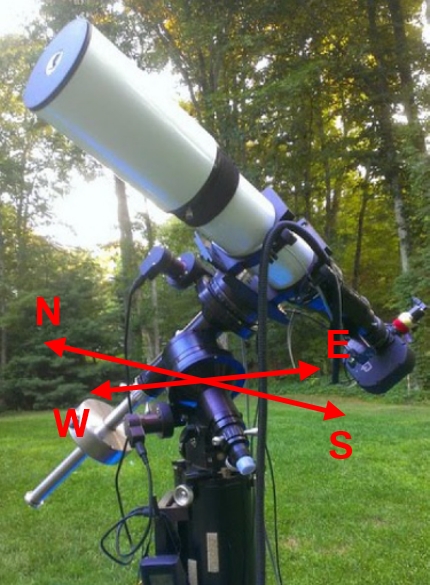
Approximate position of the telescope when looking for a star at the celestial equator in the West [1]

(11)
  • Click on "Altitude" in the editing window and the view of the editing window will change. [1]

Editing window of "Drift Align" for pole height adjustment [1]

(12)
  • Then start the drift measurement again and wait until the lines have settled. [1]

Graphical illustration of the pole height error in "PHD2“ [1]

(13)
  • Click on "Adjust" and move the star to the purple circle with the pole height adjustment until the red line is horizontal again. [1]
  • This completes the alignment.

Corrected pole height adjustment [1]

Source:
[1] https://openphdguiding.org/PHD2_Drift_Alignment.pdf